Remember in my last post, that I was lamenting (yes I did have to ask what it meant!) about the calculations of the Jelly Roll Race quilt, and how to get it to be longer and narrower than the original????? I sure hope you're sitting down to read this, but, by crikey, I think
Sharina and I, after much hair pulling, have worked it out.
****
Please note, anything written in BLUE TEXT shows the updated sections****
Seriously, we have lots of pieces of paper that look like the cast of
NUMB3RS came for a visit, and
Charlie was helping us work it out lol
Anyhoo, if for instance you want to make a Jelly Roll Race quilt that measure 72" long, you need to divide that by 2, which means you will 36 rows.....the finished strips end up being 2" finished, therefore 2 x 36 = 72, so there we get our correct length.
However, the original JRR quilt ends up being 32 rows or 64" long, no matter how many strips you start with, it'll just make it wider every time you add another strip to the mix....so here's what we worked out to correct that part of the race:
The
normal Jelly Roll Race quilt presumes you're using a Jelly Roll,
but if you wish to, you can cut your own strips (either with a rotary cutter and ruler, or like I did, using my
GO BABY, or a similar Die cutting machine) from your own fabrics, a great way to chew into your 'collection' (sounds better than stash doesn't it?)
Once you have done
ALL the caculations, you will need to make sure you cut an extra amount of strips, which I'll explain the reason for shortly.
When deciding on the length of the strips you require, you need to decide if you want to join them on the bias (just like you do when joining them for use as binding) or straight edges, using a 1/4" seam allowance. If using the bias method, then you need to make sure your strips/calculations are 5" longer than needed....as this is the amount you will lose per strip when joining them (I even did a test sew to check that my guesstimations were correct on this!)
I think an easier way of explaining this might be....if you wish to join your strips by either sewing them:
- Using a straight 1/4" seam on the short ends - each 42" strip would then become a finished length of 41.5" {42" - 1/2" = 41.5"}
- Using the Bias method - each 42" strip would end up a finished length of 37" { 42" - 5" = 37"}
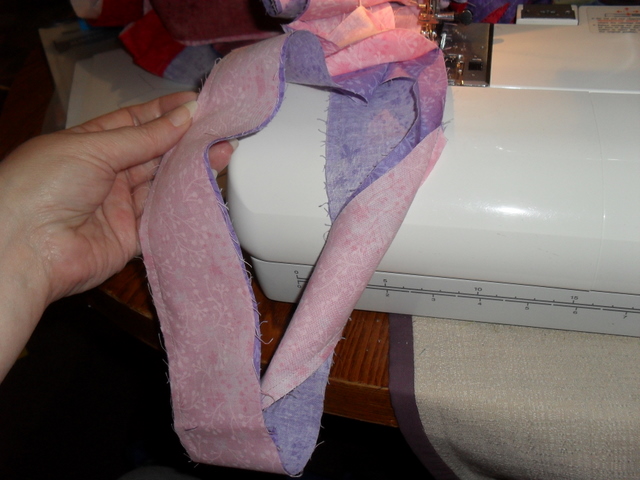
Therefore, by joining them on the bias like I have below, you actually lose 5" off the length.
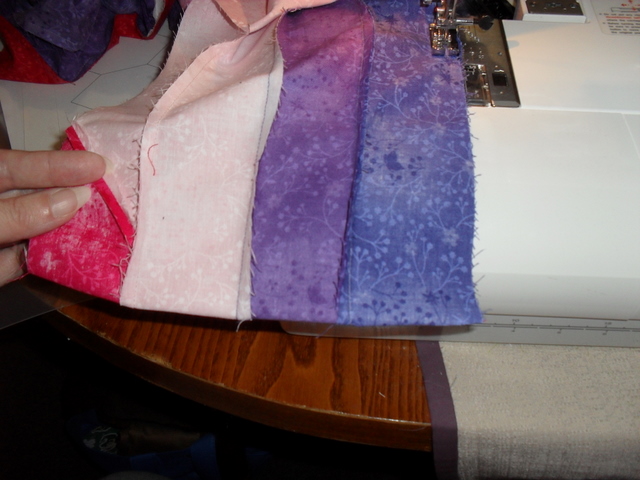
This time around, I actually used two x Splices which are imitation Jelly Rolls, and have 25 strips in each....and as I found out, not all are 42", some were shorter and some were longer! I'll show you how to rectify this shortly. The above pic, shows the pile of strips from both Splices, I then went through and selected 38 strips + 5 extra strips. The extras are the ones that I'll add in after completion of row 3. You can choose to select them at random, or pick and choose which ones make the cut or not!
Next we're going trim (if needed) each strip to make it measure 42". Place the folded end of the jelly strip on the zero mark on your cutting mat.
Trim any part of the strip that extends over the 21" mark on your mat...and voila, you will have a 42" strip. Some of the ones in the splice had very little to be trimmed and some had heaps, so I think it depends on the range/brand of Jelly Roll you use!
For instance, the above pic shows that the top layer of this strip needed about and inch trimmed off and the bottom layer needed about 3/4" trimmed....yet some had less than 1/4" trimmed off and still had the selvedge dots in them, but most of those got erradicated when I joined on the bias, or would end up being trimmed off when the quilt is being squared up. First connect the 5 extra strips together, and then set them aside. Then you are going to cut one of the remaining 42" strips so that it measures 24", this, once it's attached at the end of your long string piece, will ensure that your joins don't line up in the quilt top.
If you know how to join on the bias, skip the next couple of pics, but for those of you who haven't tried this yet, here's the process I use (up until today I didn't have a process, but worked this method out whilst doing the tutorial pics!):
The pale pink strip was the one being added to the string (all the pieces joined together like a really long strip of fabric) so I layed it right side down, and laid my square ruler, with the diagonal line (45' angle if you're using a ruler as opposed to a square) aligning the corner of the square with the corner of the jelly strip. Now grab some kind of marking device, I love the Frixxion pens, but pen, pencil, whichever works for you! You'll be marking the 45' line above the ruler on the left of the pic.
Now you have created the sewing line. Place the strip you're attaching this one to, with the loose end on the right, right side facing up and then you will put the strip you just marked face down over the corner, at a 90' angle as shown below.
Place pins either side of the drawn line (Sorry I didn't take a pic of that part of the process....bad me!) Then sew on the line.
As it's a little hard to see the stitching on the top pic, I flipped it over to show what the stitching looks like on the reverse side.
Now you're going to trim the corner triangle off.
Place the 1/4" line over your stitch line.
Cut along the edge of the ruler.
Ta-dah, triangle of excess fabric removed, and a perfect 1/4" seam line remains!
Press all the seams open as shown above. Do this to all of your strips ***remember you need to join 5 together for one string and the remaining strips will become the main quilt string.
The above pic shows all my main quilt string strips all nicely joined ready to start the actual race part of the JRR quilt.
Now you need to locate the start and finish of the string.
Even though it's a bit time consuming to do, try and have it so that the string doesn't have a twist in it. Well done, now you've found them, you are going to lay the one on the left face or right side up, and the one on the right face or right side down directly on top of the other.
Make sure you line them up directly on top of each other, I left it slightly offset so you could see what I was doing. Now you're going to sew along the right hand side of the strip, using a 1/4" seam width. The next pic shows you the side you'll be sewing. Make sure you check your bobbin before starting, best to start this row of stitching with a full bobbin, as it's quite a long seam - 1387.5" to be precise!
In the next pic, I've shown me sewing the string, part way down the length of it.
Next I'll show you what to do when you get to the loop at the bottom....
Stop stitching approx 5" or so from the end, align the edges so you can smooth it down along your machine flat bed, and finger press a crease at the loop. See below how I place my hand over the strip and gently smooth my hand along the fabric towards me.
Keep going until your fingers have caused a crease on the fold. It doesn't need to be really well pressed, just enough so you can see it....you can sort of see mine in the pic below. You might need to click on it to enlarge the pic though.
Now get your scissors and cut on the crease to separate the two layers of fabric and make it like it was two pieces.
Next you will lay the top piece down over the bottom piece, making sure the right hand side is aligned.
Now continue sewing to the end of the strip as you would normally.
At this point, I highly recommend you check your bobbin and if you have heaps (and I mean heaps) left on there, you can keep going, as you can see from mine, which was almost full when I started, that there wasn't much left on it, so at this point, I put another bobbin in the machine. I'll wait for you to organise the bobbin change over, or a pit stop.
Ok, now you need to locate both ends of the now two strip wide string.
Place them right sides together, aligning the right hand side edges.
Sew the right hand side of the string as you did for the first row.
I got near the end, and realised I had a loop (I was going to try and tell you I did it on purpose, but sadly, I'm not that clever!)
To get around it though, I just flattened it and finger creased the loop the best I could, and cut on the crease line as before. But, as you can see, it ended up being slightly off whack....it won't make much difference to the finished quilt though, as it will be in the bit you would normally trim off after quilting to square it up....PHEW! Sew to the end as before.
Rinse and repeat so to speak....following the same method as before, find the two ends, try and make sure there's no twists in the string, lay then on top of each other, right sides together, and sew down the right hand side (so you don't get confused as to which way you need to fold the quilt up and sew, when you're piecing the quilt, all the stips need to be vertically stripped....does that make sense? I hope so), when you get to near the loop, stop sewing, but leave the work under the needle and presser foot....finger crease a fold and cut along this crease, continue sewing to the end of the row.
At this point, your work will now measure 8 strips across....you now need to attach the extra 5 strips, so I'll listen to the music I have playing in the background while you go grab that piece.
Repeat the process until you've done it 5 times....CONGRATULATIONS, you've now completed a JRR quilt top that should measure somewhere in the vicinity of 43" x 72", pat yourself on the back, call your neighbours over for a party, do cartwheels, or just grab the camera, take a pic and email it to me as I'd love to see the quilts you create from this tutorial.
Are all your strips cut and ready to sew now??? Good, lets start....grab your strips at random (this is supposed to be a liberated method, so don't put too much thought into it) and join them together, using whichever of the two methods I've mentioned.
Once you have sewn the required amount of strips together, to make your original long string, you now need to join your extra set of strip together (using the same joining method) separately. Once this is done, make sure you have checked your bobbin thread amount, to make sure you're not going to run out....ask me how I know this lol It's no biggie if you do, but it's just quicker if you can sew the full length of the seam, without stopping to add the new bobbin in the machine.
Now you are going to take each end of the long string, making sure it's not twisted anywhere* (see below) and place on top of each other right sides together.
When you reach the loop at the end, usually about 4-5" or so from the end, stop sewing, but leave the needle and presser foot down, leave the strip in the machine, but flatten the end out, so it puts like a finger crease in the middle of the loop....take your scissors and open out the loop and cut on the crease line. THEN, continue to sew along to the end of the row.
Remove your work from the machine and take a deep breath, the longest part of the sewing is now done lol
Now grab each end of the 2 row strip, and repeat the process..ie lay them one on top of the other, right sides together, and sew down the long side until you get to the loop again. Cut in the same manner as the first row, and then continue sewing to the end of the row.
"Rinse and repeat" so to speak, but at the end of this row, you will have 8 rows/strips to your work, and this is where you will sew on the extra row, just make sure when you add it, that none of the seams line up too close to each other. The loop will start getting harder to cut straight, but take your time and make sure your left hand fabric edge lines up when the crease is formed, and you should be fairly 'squared up'.
Now you do the same thing again, grab each end of the work and sew down the long edge.....you will do this a total of two more times after adding your extra strip (s) in. So in my example, I went from having 9 rows/strips, to 18, and then 36, the proverbial magical carrot, dangling in front of me, finally landed where I could reach it!
After cutting the final loop and finishing sewing to the end of the row, rush to measure your quilt top, and if my math is correct, you should now have a quilt top (at flimsy stage) that measures 43.36" x 72" and you should be proud of Sharina and I for working it out for you.....we will try and work out different sizes if you need help with them, but hopefully I've explained it all well enough for you to be able to print off the pdf and calculate it all out for yourself.
*Trust me, after making a few of these recently, this tip is important...you'll make a straighter cut when you get to the loop at the end.
Just to maybe better show you how the math works out, here's the calculation workings for the 42" x 72" quilt:
- Start your engines at 1387.50" strip ÷ 2 (first row completed) = 693.75"
- 693.75 ÷ 2 = 346.875"
- 346.875 ÷ 2 = 173.44" **add your extra strip now, which won't alter these dimensions, just the amount of rows**
- 173.43 ÷ 2 = 86.72"
- 86.72 ÷ 2 = 43.36" You've just raced past the finish line.
Lastly, I shall take pics when I put our math to the final test, so the pdf link here, won't become live until the pics have been added ok?
EDITED ON 13th October 2012 to add pics to explain the tutorial.